
Play Your First Song in a Week
A practical keyboard course: G, C, D, Em → “Graves Into Gardens”
Philosophy: we are not going to start with music theory or reading notation. We’re going to start with your hands, four chord shapes, and one real song. You’ll be making real music in day one. Everything you learn is in service of playing the song — nothing extra.
Day 0: Setup (10 minutes)
Sit right. Bench height so your forearms are level with the keyboard, elbows close to your body, not locked out. Wrists relaxed — not drooping, not arched like a claw.
Find your landmark. Look at the keyboard: black keys come in groups of 2, then 3, then 2, then 3, repeating. Find any group of 2 black keys. The white key immediately to the left of that group is C. Find the one nearest the middle of the keyboard — that’s Middle C. This is your home base for everything below.
Finger numbers (both hands, same system):
- 1 = thumb
- 2 = index
- 3 = middle
- 4 = ring
- 5 = pinky
That’s it. You’re ready.
Part 1: The Four Chords
A chord, at the beginner level, is just three notes played together, stacked in 3s from the white keys (skip one, land, skip one, land). We’re only going to learn four shapes. Once your hand knows them, you can play hundreds of songs.
For each chord below: play it root position, right hand only, fingers 1-3-5. Say the letter names out loud as you play — this trains your eyes and ears together.
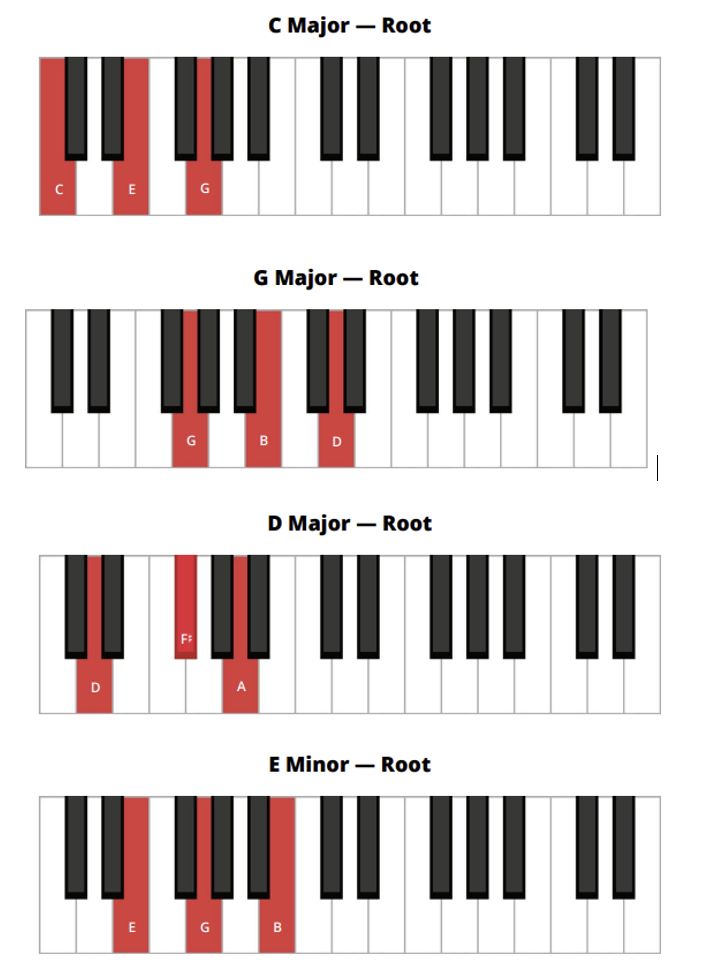
Left hand (do this in parallel, not after): for now, left hand plays just the root note, one octave below, with finger 5 (pinky). C→C, G→G, D→D, Em→E. This single bass note under each chord is exactly how we’ll play the song — root in the left hand, full chord in the right.
Part 2: Exercises (do these before touching the song)
Use a metronome or just tap your foot. Slow is correct. Speed is not the goal — clean changes are.
Exercise 1 — Hold and release Play each chord (right hand) for 4 slow beats, lift, reposition, play the next. Order: C – G – D – Em – C. Do 3 loops. Say the chord name as you land on it.
Exercise 2 — Hands together, root + chord Left hand plays the root note on beat 1 only, right hand plays the full chord and holds it. Same order, 4 beats each: C – G – D – Em – C.
Exercise 3 — The G ↔ Em shortcut Alternate G and Em only, 2 beats each, 8 times. Notice your hand barely moves — this is the exact pivot the song uses over and over.
Exercise 4 — The song’s real progression, chords only This is the actual chord sequence you’ll use, isolated from the song so your hands learn it “blind” first:
G → C → Em → D → G
Play each chord for 2 slow beats, right hand only, looping until it feels boring/easy. Then add the left-hand root notes. Boring-and-easy is exactly where you want to be before adding the song.
Part 3: The Song — “Graves Into Gardens” (Elevation Worship, key of G)
A quick note: this is a real, popular worship song, originally in the key of B. I’m giving you a simplified beginner arrangement in G, built on the four chords above — some of the original’s fancier voicings (like C/E or D11) are simplified to plain C, D, G, and Em so you can actually play it today. It’s in a gentle 6/8 feel (count it in groups of 3: “1-2-3-4-5-6” per bar, or just feel it as a slow triplet sway).
How to play each section: left hand = root note on beat 1 of the bar (and again on beat 4 if you want more movement), right hand = block chord held for the bar. One chord = one bar unless noted.
Verse (this pattern repeats for both verses)
G | C | Em | D |Chorus
G | Em | C | G |Bridge (this is the big, anthemic “turn graves into gardens” section — and it’s entirely inside your four chords, no exceptions)
G | C | Em | G | (repeat)How to practice it (this order matters)
- Left hand only, root notes, all the way through slowly. Just get the bass line under your fingers and locked to the beat.
- Right hand only, chords, all the way through slowly.
- Hands together, half speed, verse only. Loop it until it’s smooth — 10 loops if needed.
- Add the chorus. Loop verse → chorus.
- Add the bridge last — it’s the payoff, and by the time you get there your hand will already know G, C, and Em cold.
- Once it’s smooth, put on a recording of the actual song and play along. This is the fun part — do this every day, even before you feel “ready.” Playing along with real music is what makes it click.
7-Day Practice Plan (15–20 min/day beats 60 min once a week)
| Day | Focus |
|---|---|
| 1 | Setup + learn C and G shapes. Exercise 1 with just these two. |
| 2 | Add D and Em. Exercise 1 with all four. Start Exercise 2 (hands together). |
| 3 | Exercise 3 (G↔Em pivot) and Exercise 4 (song progression, chords only). |
| 4 | Verse section: left hand alone, then right hand alone. |
| 5 | Verse hands together, slow. Repeat until smooth. |
| 6 | Add chorus. Verse → chorus, hands together. |
| 7 | Add bridge. Play the whole simplified arrangement along with the real recording. |
After day 7: keep playing along daily. Try speeding up gradually. Once this feels easy, you already know the four most common chords in modern music — you can point at almost any simple pop or worship song using G, C, D, Em and start figuring it out by ear, which is a great next skill to build.
A note on “not reading music”
You’re right to skip notation for now — chord-shape learning gets you playing real songs fast, and that’s what builds motivation. If later you want to go deeper (reading, more chord voicings, inversions, other keys), that’s a natural next course once this one feels easy. For now: hands on keys, chord in the ears, song in the fingers.